Lately I received a lot of requests, and somehow all were
linked to vegetables. And I thought why wont it be, it’s the perfect weather in
India to indulge in beautiful fresh vegetables. And so, I am on a roll. I am
going to do three mouth-smackingly fast winter recipes which are 100%
vegetarian. This is the first in the series...
Now, a Biryani, is not complete without the perfect rice. Yes!
I am aware of the beautiful array of long grain basmati rice available in our
supermarkets. Priced anywhere between 100 to 150 INR/Kilo; they are the best
variety to use in this recipe. But somehow, it’s beating my point flat. Weren’t
my recipes supposed to be exquisite, yet less expensive; exotic, yet using daily
routine stuff and time; delicious, yet healthy in every sense. I mean don’t get
me wrong, yes I do use a 500-rupee-block of cheese (Parmigiano Reggiano) in my
cooking, but that cheese lasts me long and it adds a flavour, I am yet to come
across in the cheaper varieties. But when ‘Dawaat’ introduced me to their
Rozana rice, I was flabbergasted. Priced at a modest 65 INR/Kilo, it looks and feels really nice. A great smell
to the rice as well. And, let’s be honest, after the addition of spices,
fragrant veggies & herbs, and saffron, are you still looking out for the
smell of rice?? I am pretty happy adding
this particular range of rice in my Biryani. But, if you still insist on using
proper biryani rice, go for the other ranges by Dawaat.
There are three words in my recipe name. We have talked
about Subz (meaning: vegetables) and Biryani (meaning: one pot rice dish). So,
let’s talk about the last of it left Pudina
(meaning: mint). In Indian cooking, we have always used this herb in the form
of chutney (loosely translated into a spicy dip). Now at times, it’s used as a
marinade, or as a thing to dunk a kabab in. But, we never really cook with this
herb. That privilege is given to cilantro, and it stays with it. But the
experimentative me tried a meat biryani with mint. Widely used in Muslim (mostly
Arabic or Persian) cooking styles, I instantly fell in love with the fresh
taste it imparts in cooking. And so here I am, with my experiment of a one pot
wonder which has the health of fresh winter veggies, aroma of fresh mint and
the hearty meal of Dawaat Rozana Rice.
 Ingredients:
For the Biryani Part
of the dish:
1 cup Dawaat Rozana Rice
Salt to taste
A bunch of whole spices like a star anise, a cinnamon stick,
couple of cloves, a dried red chilly and ½ tsp of shahi jeera.
2 onions chopped
Big handful of mint leaves, chopped
Big handful of coriander leaves, chopped
A pinch of saffron with warm water
2 tbsp oil to fry the onions
For the Vegetable part
of the dish:
Half a cup of cauliflower florets cut roughly in 1 inch long
pieces
1 potato cut roughly in 1 inch long pieces
Half a cup of red carrots cut roughly in 1 inch long pieces
Half a cup of baby onions
4 -5 big mushroom, halved
¼ cup of green peas peeled

Marinade the veggies
for 15 minutes in a mix of:
4 - 5 tbsp curd
Turmeric to taste
½ tsp Cumin powder
½ tsp Coriander powder
¼ tsp all spice powder (Garam Masala)
Cinnamon powder to taste
Salt to taste
1½ tbsp of olive oil (love the fruity flavour it adds,
groundnut oil will work too)
½ tsp garlic paste
½ tsp ginger paste
And 2 tbsp of oil for roasting the veggies slightly
Method:
I always mix these spices in the curd and whisk it well to
incorporate. Then slowly add in the uncooked veggies to sit and absorb the flavours
of these spices.
Before you start prepping the ingredients for the dish, soak
the rice in some water and let it rest there for at least 10 mins, longer the
better.
Meanwhile prep the herbs and onions, and get a pan of water
to come to the boil.
Once the water starts boiling, throw in the whole spices and
a generous amount of salt. Remove the residual water in which the rice was
sitting and add it to the boiling pan of flavoured water. Let it cook for 3 - 4
minutes on a high flame, till the water comes back on a rolling boil. By this
time, the rice should be 40% done, with a resisting bite in the middle part of
the grain. Remove the rice from boiling water (but don’t throw away the
flavoured water) and let it drain thoroughly.
While your rice is cooking, heat a wok with oil and
caramelise your onions till light brown. Once you are happy with the colour,
mix in a pinch of salt to season and remove from the wok.
Now, in the wok where you fried the onions, pour in another
tablespoon of olive or groundnut oil and roast the veggies slightly to enhance
the flavours. This is an optional step but I strongly recommend you to do so.
Once all these tedious prepping is done, start layering your
Pressure cooker. I suggest use a pretty one, which can later be also used as a
serving dish.
Now to layering:
Oil the bottom of the pressure cooker well. Now pour in the
roasted veggies, along with the marinade. Sprinkle on a good helping of cilantro
& mint leaves, and fried onions.
This should be followed by 2 -3 tbsp of the flavoured
cooking water of the rice. This small amount of starchy moisture is important
to ensure the veggies cook down perfectly.
Layer on the rice, and repeat sprinkling of cilantro & mint
leaves, followed by fried onions.
At this stage feel free to add in any nuts if you may want
to. Finish of the layering with 2 – 3 Tbsp of Saffron water.
Tightly secure on the lid and let it cook on a high flame
till it blows the whistle for the first time. Remove from heat and let it
release the steam slowly, unaided.
One of the most express ways to make a Biryani.. Cheers!!
Note- Since I bought a cheap electric steamer in my house, I have converted to putting this rice and veggie mix in the steamer rather than in a pressure cooker. But the microwave option is not as tasty as the steamer or pressure cooker.


 Preheat
the oven to 200 degrees C and line a 9X9 inch baking pan with butter paper and set
it aside for use.
Preheat
the oven to 200 degrees C and line a 9X9 inch baking pan with butter paper and set
it aside for use. 

 Ingredients:


 I have been really lazy here on the blogging front! I
delayed this valentine’s treat of laborious tale of love till 15th Feb...
But I have a valid point; I made it for my valentine’s special dinner. So, I am
blogging about it right today, past the D-day!! And anyways, with v day falling
on a week day, not a lot of couples were able to celebrate it together. So,
this can be a wonderful smear-and-lick-project for the valentine’s weekend
coming up.
I have been really lazy here on the blogging front! I
delayed this valentine’s treat of laborious tale of love till 15th Feb...
But I have a valid point; I made it for my valentine’s special dinner. So, I am
blogging about it right today, past the D-day!! And anyways, with v day falling
on a week day, not a lot of couples were able to celebrate it together. So,
this can be a wonderful smear-and-lick-project for the valentine’s weekend
coming up.  Ingredients:

 But then, I saw an advertisement of a certain foreign company,
selling masala oats in India!!! !@#$@$! And imagine my dismay on looking at the slimy,
salty oats porridge that they are selling under the name Oats Masala. Really,
oats doesn’t need to be slimy all the time!! With the right amount of
technique, we can make a super delicious breakfast in mins. And trust me, you
will shell a quarter of the “@#@#er Oats Masala” price, too.
But then, I saw an advertisement of a certain foreign company,
selling masala oats in India!!! !@#$@$! And imagine my dismay on looking at the slimy,
salty oats porridge that they are selling under the name Oats Masala. Really,
oats doesn’t need to be slimy all the time!! With the right amount of
technique, we can make a super delicious breakfast in mins. And trust me, you
will shell a quarter of the “@#@#er Oats Masala” price, too. 

 Ingredients:
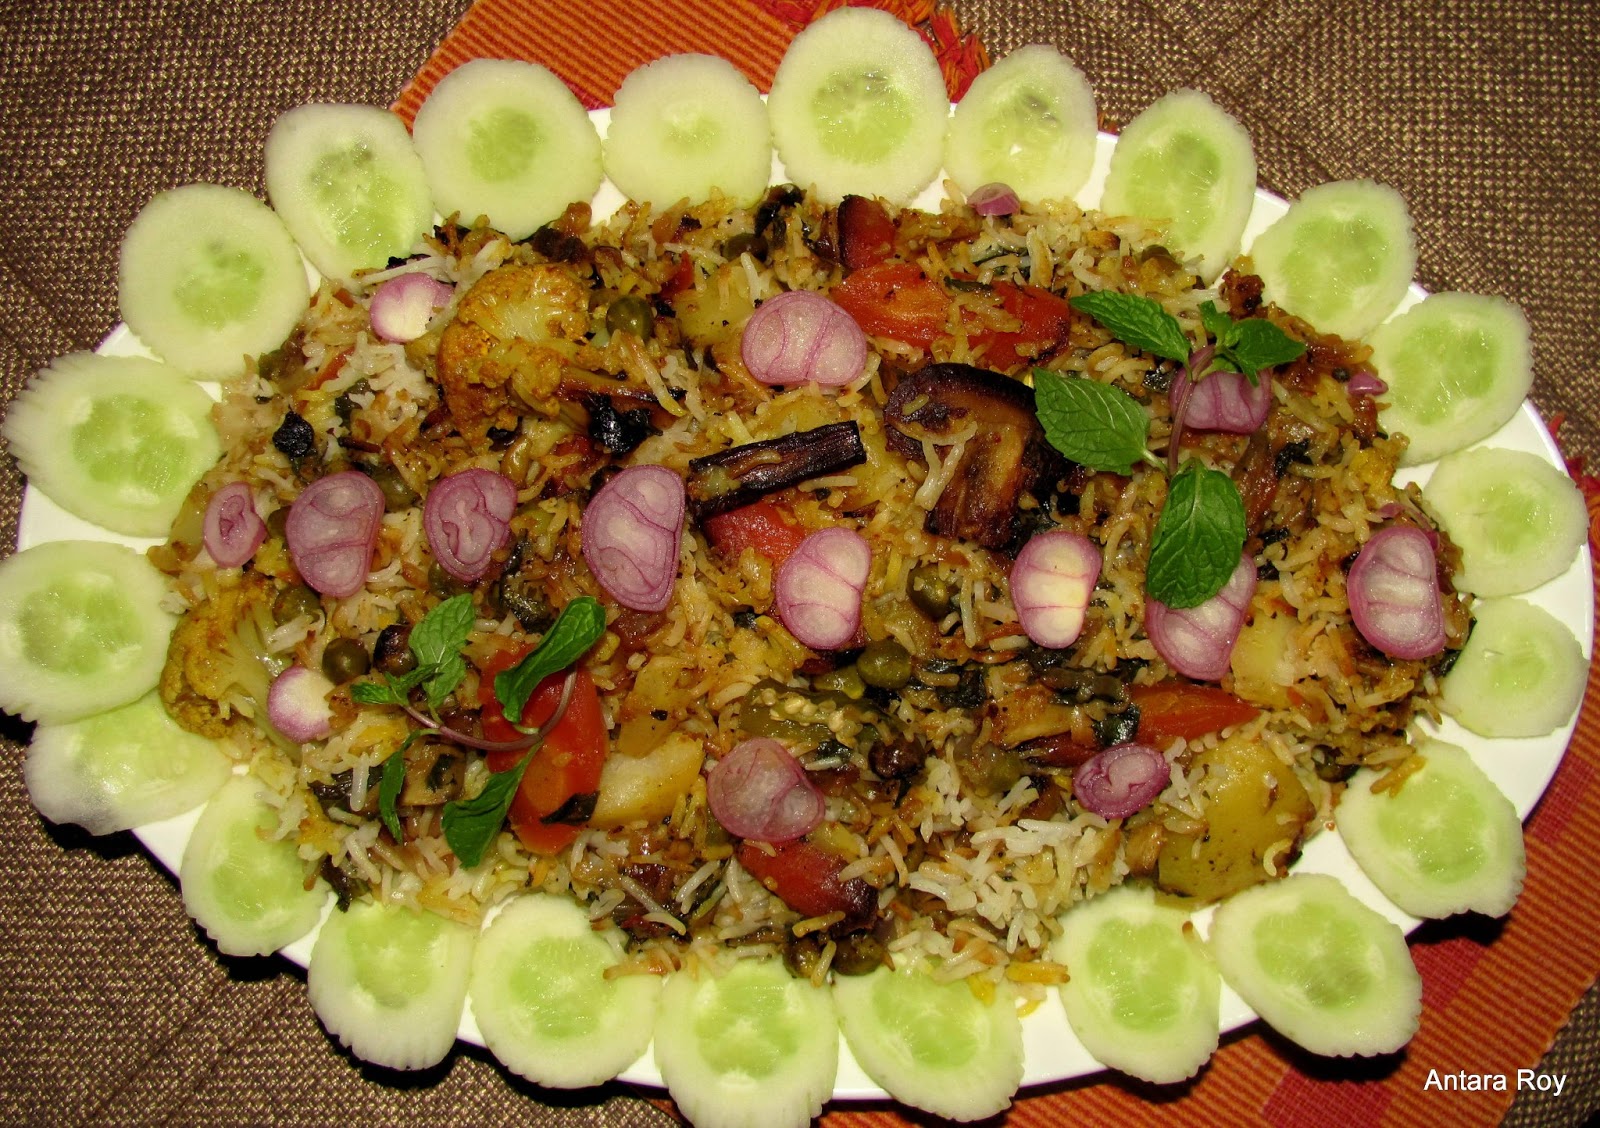

